Adding outdoor wall sconces to your home is one of the quickest ways to boost curb appeal, enhance security, and create a warm, inviting atmosphere. There’s nothing quite like the glow of well-placed lighting to highlight architectural features or guide guests to your front door. If you’re ready to tackle a DIY project that makes a real impact, learning how to install outdoor wall sconces is a fantastic skill to have. It’s a job many homeowners can handle, provided you’re careful and follow the right steps. Let’s walk through how to install outdoor wall sconces safely and effectively, transforming your exterior spaces.
Planning Your Outdoor Lighting Project
Before you even think about grabbing tools, good planning is essential. You’ll want to consider where your new sconces will go, what size they should be, and if your current electrical setup can support them. This initial thought process really makes the installation smoother.
Where to Install Outdoor Wall Sconces
Think about the purpose of your outdoor lighting. Are you illuminating a front door, a garage, a back patio, or a side walkway? For front doors, you’ll often see one sconce on each side. For garage doors, a single fixture between doors or one on each side of a single door works well. On patios, sconces can define the space and provide ambient light.
Sizing and Placement Considerations
Sizing is key for sconces to look right on your home. A common guideline for sconces flanking a front door is that they should be about one-quarter to one-third the height of the door. If you’re installing a single sconce above a door, it should be about one-third to one-half the door’s width.
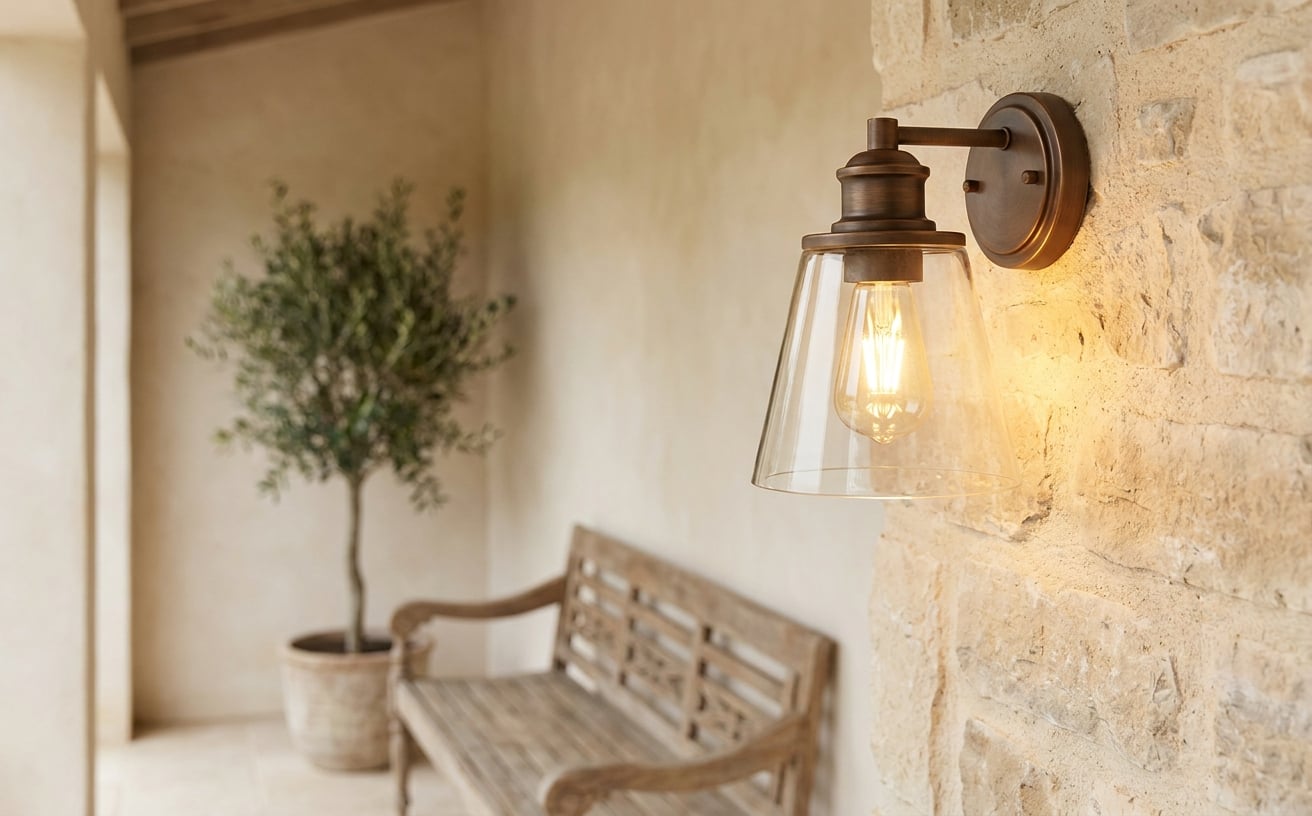
When it comes to height, a good rule of thumb is to mount the fixture so its center is roughly 66 inches (167 cm) from the ground. This places the light source slightly above eye level for most people, preventing glare. However, if you have a very tall door or high ceilings on a porch, you might adjust it up a bit. For instance, if your front door is 8 feet tall, you’d likely want your sconce centered higher than 66 inches.
Expert Tip: Don’t just hold the sconce up. Cut out a paper template of the fixture and tape it to the wall at different heights and positions. Step back from the street or yard to get a real feel for how it will look. What seems right up close can often be too small or too high from a distance.
Assessing Electrical Needs
Most outdoor wall sconces will replace an existing fixture, meaning you already have a wiring box in place. If you’re adding new lights where there’s no existing wiring, or if you’re dealing with a complex lighting scheme, I’d strongly recommend hiring a licensed electrician in your area. Installing new circuits or running wire through exterior walls is usually beyond a typical DIY project, and it’s worth every penny for peace of mind and safety. An electrician will ensure everything meets code and is properly grounded.
Essential Tools and Materials You’ll Need
Having the right gear before you start will prevent frustrating trips back and forth to the hardware store. Here’s what you’ll likely need to install outdoor wall sconces:
- Your new outdoor wall sconce(s)
- Mounting bracket and hardware (usually included with the fixture)
- Screwdriver set (Phillips and flathead)
- Wire strippers/cutters
- Non-contact voltage tester (essential for safety)
- Needle-nose pliers
- Ladder or step stool (make sure it’s stable on uneven ground)
- Caulk gun and exterior-grade silicone caulk (for weatherproofing)
- Wire nuts (usually included, but good to have extras)
- Electrical tape
- Work gloves
- Safety glasses
- Pencil
- Drill (if you need to make new pilot holes for the mounting bracket)
Critical Safety Steps Before You Begin
Electrical work, even simple fixture replacement, requires respect for the power involved. Ignoring safety could lead to serious injury or damage. We’re not just saying this; it’s genuinely important.
1. Turn Off the Power at the Breaker Box
This is non-negotiable. Locate your main electrical panel and find the circuit breaker that controls the light you’ll be working on. Flip it to the “OFF” position. If you’re unsure which breaker it is, it’s always safest to turn off the main breaker for your entire home. Tag it or put a note on it so no one accidentally flips it back on while you’re working.
2. Verify the Power is Off
Don’t skip this step. Use your non-contact voltage tester to confirm that the power is indeed off at the fixture location. Touch the tester to the wires coming out of the electrical box. If it lights up or beeps, the power is still on. Go back to the breaker box and try another breaker. Repeat until the tester shows no power. This small step prevents a nasty shock.
3. Work Safely on a Ladder
Ensure your ladder is stable on a flat, firm surface. If working outdoors, be mindful of soft ground or uneven pavers. Have someone spot you if possible, especially if you’re reaching or working at an awkward angle. Don’t overreach; move the ladder instead.
Step-by-Step Guide to Install Outdoor Wall Sconces
Once you’ve done your planning and safety checks, you’re ready for the actual installation. Here’s a detailed breakdown of how to install outdoor wall sconces properly.
1. Remove the Old Fixture (If Applicable)
If you’re replacing an existing light, carefully unscrew the old fixture from the wall. You’ll typically find a couple of screws holding it in place. Once removed, you’ll see the electrical wires connected with wire nuts. Unscrew these wire nuts and gently separate the wires. Make sure to note which wires are connected (usually black to black, white to white, and bare copper or green to ground).
2. Prepare the Mounting Surface and Bracket
Examine the existing electrical box. It should be securely fastened to the wall framing. If it’s loose, tighten it. The new sconce will come with a mounting bracket. This bracket usually attaches to the electrical box with two screws. Thread the fixture wires through the center hole of the mounting bracket. Position the bracket so the mounting screws for the new fixture are oriented correctly (often horizontally for round fixtures or vertically for rectangular ones).
3. Connect the Wires
This is where your careful attention pays off.
* Ground Wire: Connect the bare copper or green wire from the fixture to the bare copper or green wire from the house wiring. If your house wiring doesn’t have a ground wire, connect the fixture’s ground wire to the green grounding screw on the mounting bracket.
* Neutral Wire: Connect the white wire from the fixture to the white (neutral) wire from the house wiring.
* Hot Wire: Connect the black wire from the fixture to the black (hot) wire from the house wiring.
Twist the ends of each pair of wires together clockwise with your needle-nose pliers, then cap them securely with wire nuts. Give each wire a gentle tug to ensure the connection is solid. For extra security, you can wrap a bit of electrical tape around the wire nut and wires.
Securing the Wiring for Your New Outdoor Wall Sconces
After making your connections, carefully tuck the wires back into the electrical box. You don’t want them pinched or exposed when the fixture is mounted. This also helps keep the fixture flush against the wall.
4. Mount the New Fixture
Line up the mounting holes on the back of your new sconce with the mounting screws protruding from the mounting bracket. Carefully push the fixture onto the screws, making sure not to pinch any wires. Secure it in place with the decorative nuts or screws provided with your fixture. Don’t overtighten, but make sure it’s snug and doesn’t wiggle.
5. Seal Around the Base for Weatherproofing
This is a step many people forget, and it’s crucial for outdoor fixtures. Water intrusion can cause shorts, damage to your home, and even fire hazards. Apply a bead of exterior-grade silicone caulk around the top and sides of the sconce where it meets the wall. Do not caulk the bottom. Leaving the bottom unsealed creates a weep hole, allowing any condensation or water that might get behind the fixture to drain out. This is a common point where I’ve seen installations go wrong, leading to water damage over time.
6. Restore Power and Test
Once the caulk is dry (check the caulk product’s instructions for curing time), head back to your breaker box. Flip the circuit breaker for your outdoor lights back to the “ON” position. Now, test your new outdoor wall sconces! If they don’t light up, turn the power off immediately and recheck your wiring connections.
If you’ve installed new wiring or are dealing with a heavy fixture (anything over 10 lbs), I’d always recommend having a licensed electrician do the final connections and inspection. They’ll ensure everything is safe and up to code, giving you complete confidence in your new lighting.
Common Mistakes to Avoid When Installing Outdoor Wall Sconces
Even with a detailed guide, it’s easy to overlook small details. Here are a few common pitfalls to steer clear of:
- Not turning off the power: This is the most dangerous mistake. Always, always verify power is off with a voltage tester.
- Incorrect wire connections: Mixing up hot, neutral, or ground wires can damage the fixture, trip breakers, or create a shock hazard. Double-check your connections.
- Poor weatherproofing: Failing to caulk properly, or caulking the bottom, can lead to water damage inside your walls or electrical box.
- Over-tightening mounting screws: This can crack the fixture’s housing, especially if it’s glass or a delicate material.
- Unstable ladder use: Falls from ladders are a significant cause of injury. Be safe, get help if needed.
- Buying the wrong size fixture: A sconce that’s too small or too large will look out of place. Measure and use templates during the planning phase. Our extensive outdoor wall lights collection offers a range of sizes and styles to fit any architectural aesthetic.
Frequently Asked Questions
How high should outdoor wall sconces be mounted?
Generally, the center of an outdoor wall sconce should be about 66 inches (167 cm) from the ground. This places the light slightly above eye level, which helps prevent glare. However, adjust this height to be proportional to your door’s height or the overall scale of your home’s exterior.
Can I replace an existing outdoor light myself?
Yes, replacing an existing outdoor light with a new wall sconce is a common DIY project for homeowners. The key is to follow all safety precautions, especially turning off the power at the breaker and verifying it with a voltage tester before you touch any wires. If you’re unsure or uncomfortable, call a professional.
What’s the best way to weatherproof an outdoor sconce?
After installing your sconce, apply a continuous bead of exterior-grade silicone caulk around the top and sides where the fixture meets your home’s exterior wall. It’s crucial to leave the bottom edge uncaulked. This allows any moisture that might get behind the fixture to drain out, preventing water from pooling and causing damage.
Do outdoor wall sconces need a special electrical box?
Outdoor wall sconces typically mount to a standard exterior-rated electrical box. These boxes are designed to be weather-resistant and provide a secure connection point. If your existing box isn’t exterior-rated or is damaged, you’ll need to replace it with a proper one, which might require a licensed electrician.
Installing new outdoor wall sconces is a project that truly brightens your home’s exterior and adds undeniable character. With careful planning and attention to detail, you’ll enjoy the fruits of your labor for years to come. Explore our selection of high-quality outdoor wall lights to find the perfect fixtures for your home.